Hello fellow readers!
I'm really trying to keep up with my site and work but not to worry I'm still alive, I finished the thesis films I worked on ("Krathong", "Fetch", and "The Peasant and the Prince") and I graduated from the Rochester Institute of Technology with a BS degree in Motion Picture Sciences.
My original plan was to start my internship in LA but I hit a little snag that prevented me from going. I'm currently still in New York, planning to move to Philadelphia where there are many opportunities for me. Also in the meantime I'm planning on fixing the issues I currently have with the Simulation Editor and to post an updated version of it for you to download and use for free (being an open source tool). I am also developing other tools for various animation softwares but I can't say any more about it here but trust me they are going to be great! I also have plans to create a tutorial series to help others develop their own tools and plug-ins for any software so look for those in the future as well! I will post short films, tool demos, demo reels, and more in the future and will keep you updated on my job situation.
Never fear, as long as I am still alive I will continue to work on films, and tools to help my fellow artists and engineers!
Thanks for stopping by and come back soon!
~Carl Thomas Gustafson
Friday, May 29, 2015
Wednesday, March 25, 2015
Updates 3-25-2015
Hey everyone!
I have been very busy with school and thesis lately, so I'm sorry I haven't been writing a lot on how it's all coming along. My Simulation Editor has been going through some major changes lately, and will be re-released soon for all to use. I have made it so that it can turn on and off the Bifrost fluids, and am fixing a bug that allows the user to ramp their effects.
As for the thesis work I plan to post some of my tests this or next week so keep an eye out for that. I am also getting my demo reel/technical videos polished up so that they can be posted here on my blog!
Thanks for visiting! :)
Tuesday, January 27, 2015
Ruudy's Spring
 |
| Here is a comparison between Maya's Default PolyHelix and Ruudy's Spring. |
I had taken a class on Particles and Dynamics, which was being taught by Ruudy Liu. Ruudy was teaching us about creating rigid body constraints in Autodesk Maya, and showed us how to create a spring. He first demonstrated modeling a spring using the helix polygon, and explained that although this was easy to do, it was not ideal. He then showed us how to make a spring using locators, the CV Curve tool, and the polyDisk, which proved to be a better way to create the spring, but the process was so long that I decided to build a tool to make this process both easy and ideal.
The current module I wrote looks like this:
"""
RuudysSpring.py
Author:: Carl Gustafson
Date:: 1/23/2015
Language:: Python and MEL
Description:: This creates a model spring that can be used with the Spring Constraint
eliminating the problems of the Poly Helix.
Version:: 1.5.1.
Copyright:: (c) 2015 Carl Gustafson
"""
#Import all Necessary Libraries and Classes
from math import *
import maya.cmds as cmds
import maya.mel as mel
#Functions
def makeSpiral(numSpan,rad,dis,name,useGrad,grad):
#This function makes the spiral
#Error check
if useGrad>1 or useGrad<0:
print("useGrad=%s"%useGrad)
cmds.error("VALUE ERROR: useGrad needs to be either 1 or 0! Line 16")
if rad<0:
cmds.error("VALUE ERROR: the radius can not be less than 0! Line 16")
#Get the initial X, Y, and Z positions
posX=math.cos(0)*math.exp(useGrad*grad)
posY=rad*dis
posZ=math.sin(0)*math.exp(useGrad*grad)
#Get the curve name
curveName=cmds.curve(d=3,p=[posX,posY,posZ])
#add more curve points to the spiral
for idx in range(numSpan-1):
posX=math.cos(idx+1)*math.exp((idx+1)*useGrad*grad)
posY=(idx+1)*rad*dis
posZ=math.sin((idx+1))*math.exp((idx+1)*useGrad*grad)
cmds.curve(curveName,os=True,a=True,p=[posX,posY,posZ])
#End
#Rename the curve
cmds.rename(curveName,name)
#End
def makeSpringMesh():
#This Creates the Spring
#Variables
numSpan=50
radius=1
dis=0.1
name="RuddysSpring_Curve"
useGrad=0
grad=0.1
#Make the Spiral
makeSpiral(numSpan,radius,dis,name,useGrad,grad)
#Create the spring
mel.eval('''polyDisk;
scale -r 0.1 0.1 0.1 ;
move -r -os -wd 1 0.1 0 ;
setAttr "pCircle1.rotateX" 90;
setAttr "pCircle1.rotateZ" 180;
select -tgl RuddysSpring_Curve ;
hilite pCircle1 RuddysSpring_Curve ;
selectMode -component ;
select -r pCircle1.f[0:76] ;
polyExtrudeFacet -constructionHistory 1 -keepFacesTogether 1 -pvx 1 -pvy 0.1 -pvz 0\
-divisions 1000 -twist 0 -taper 1 -off 0 -thickness 0 -smoothingAngle 30\
-inputCurve RuddysSpring_Curve pCircle1.f[0:76];
select -r pCircle1 ;
rename |pCircle1 "RuudysSpring" ;
DeleteHistory;
select -r RuddysSpring_Curve ;
doDelete;
''')
#End
#Test Harness
if __name__=='__main__':
makeSpringMesh()
#End
This module is the start of the new tool I am developing for Maya that creates the spring that Ruudy taught our class. Although Ruudy may not have been the first person to have modeled a spring like this, I still felt it was appropriate to name this tool and method after him. Once I build an actual GUI, the user will have the option to edit the radius of the spring, the number of coils, the distance between the coils, and the option to make the the spring's radius gradually increase or decrease. There are already tools online that made the spiral curves, but I wanted to go beyond them and create a tool that actually creates the spring mesh. To do this I had to create the curves, and then a polyDisk which was scaled down and adjusted so that it aligned with the bottom of the spiral curve. With the polyDisk and the curve selected, the disk was then extruded with only 1000 divisions, then the curve is deselected, the mesh is renamed, the history is deleted and finally the spiral curve is then deleted.
Although Ruudy's Spring is not perfected yet, it is the start to improving the process of modeling spiral objects in Maya.
Monday, October 13, 2014
The Simulation Editor (Updated Version)
 |
| The Current Version of the Simulation Editor |
Here
is the most recent version of the Simulation Editor. As you can see there are
several new features that I have added to help the animators handle the effects
pipeline and animate the scene. Although
there is still more work that needs to be done, I can safely say that this tool
will be completed very soon.
As
mentioned in my previous post about the Simulation Editor, the first set of
options is made to enable and disable the dynamic elements in the scene. This
allows the animators to focus on the animation and to make adjustments in their
scene if needed, without the frustration of playback lag, disabling each
dynamic element individually, and uncertainty of which dynamic elements were
enabled or disabled. The previous version I made was not able to work with
nHair and Soft Bodies, however I have fixed that problem so now the Simulation
Editor is able to enable/disable all simulations in Maya.
The
other options of my Simulation Editor are methods to initialize/clear
initialize the states of fluid containers (which also works on Maya’s Ponds and
Ocean simulations), and to ramp nParticles and/or nCloth of a scene. I have
added an input box, which allows the user to put in the starting frame (though
this might change so that this will update automatically). However now I have a
new bug which refuses to ramp the nCloth, and nParticles which I am currently trying
to fix.
The
other features I have added include allowing the animators to change objects
into active/passive rigid bodies, passive colliders, and to create a new
nucleus for dynamics elements that can have one. The reasons for this is to
make the tool have all essential functions, and to create a new nucleus so that
not all dynamic elements have the same nucleus, so that if you are ramping only
an nCloth, you don’t accidentally ramp anything else. It still needs a few
adjustments but once it’s completed it’ll prove to be very useful for the
effects in the scene.
The
final feature that I have added allows users to easily bake and cache their scenes
when they are ready to render it. I added this to make the tool more holistic
to the animation pipeline.
There
are still more bugs to squash, and codes to write but it should be done in
about two weeks.
Wednesday, September 3, 2014
The Simulation Editor (Work in Progress)

One of the first tools I began making was a
simple Simulation Editor. The purpose of this tool is to control the dynamic
elements of the scene, to help animators with their workflow, and to initialize
the states of most simulations. Although this tool is not finished yet, it does
carry out most of its basic functions.
The first set of options on the Simulation
Editor is made to enable or disable most of the simulations in your scene. When
working with simulations, animators may experience a great deal of lag or slow
playback when reviewing the scene. Because of this, making adjustments to a
scene can be both a slow and frustrating process. The solution to this is to
turn off all of the dynamic properties of the scene, allowing animators to
scrub through the timeline, playback the scene, and make adjustments where
needed. You can do this in Maya already but the two methods Maya provides are
flawed. The first method is to select each dynamic element one at a time and
disable them individually, which is not only a slow process but it becomes
harder to keep track of which dynamic elements are off, and which are on. The
second method is to go to the menu bar and select Modify>Evaluate Nodes and
either hit Ignore All or Evaluate All, or select the dynamic elements
individually. This is also flawed however because Ignore All and Evaluate All
could turn on or off a node you didn’t want to touch. This also makes it hard
to keep track of what elements are already on or off or what in the scene need
to be turned on or off, and animators may forget to turn those nodes back on
before it’s too late.
With the Simulation Editor you can instantly see
if your simulations are enabled or disabled. It finds all of the dynamic
elements that are in the scene and turns them off.
|
| (Hover mouse over to "Disable" simulations) |
It currently works for most simulations except
nHair and Soft Bodies but the end result will definitely be able to control
them as well.
The other options I added to the Simulation
Editor are methods to initialize/uninitialized the states of fluid containers
(it also works on ponds and ocean), and to ramp nParticles and/or nCloth of a
scene.
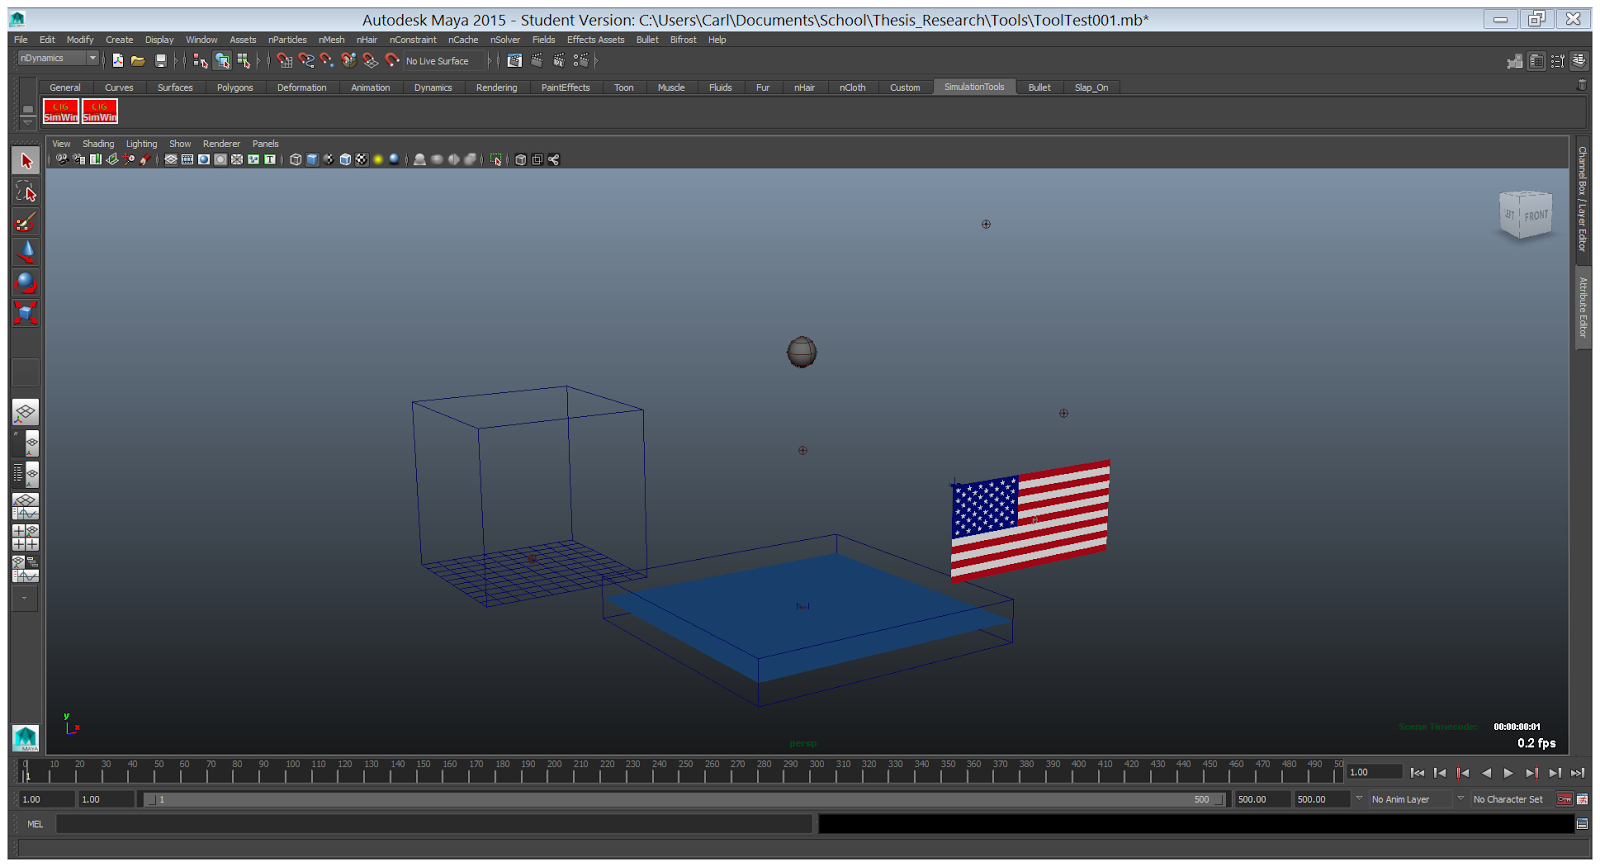
Here is a scene where there are many dynamic
elements. I used this to test out my tool. Let’s say we want to ramp the flag
(which is an nCloth) so it doesn’t start off looking stiff. You can ramp it by
playing the scene until you see a position you like and then select the flag.
 |
| (Hover mouse to "select" the flag) |
Then by selecting the Ramp option on the
Simulation Editor, it makes a temporary cache of the flag, sets the start frame
at the negative value of where you selected, and adjusts the playback timeline so
that the simulation starts where you set it.

There is also a Reset Ramp option on the
Simulation Editor, which is added in case the animator made a mistake or wishes
to start the simulation earlier or later, currently does not work exactly
the way I had planned (I have a hard time deleting the cache) but
hopefully once the simulation editor is finished it will look like this:
|
| (Hover mouse to "Reset Ramp") |
There is still a lot of work to do and more
features I wish to add to it, but the Simulation Editor will hopefully be
finished in a few weeks so the animators will have a chance to use it.
Greetings
Hello! My name is Carl Gustafson, and this is my first blog! I am currently a senior at the Rochester Institute of Technology (R.I.T.), where I am getting my Bachelor of Science degree in Motion Picture Sciences. For my senior thesis, I am currently working as an effects technical director for two films:
I hope to some day work for a major studio and grow my skills as a technical director.
This blog will keep you up to date with what I am currently working on, my latest demo reel, how the films are going, and more!
- Krathong (directed by Gina Pidej)
- Fetch (directed by Cameron McKenzie)
I hope to some day work for a major studio and grow my skills as a technical director.
This blog will keep you up to date with what I am currently working on, my latest demo reel, how the films are going, and more!
Subscribe to:
Posts (Atom)